Software developers always have something to share: some unique experiences and opinions. But only few of us make vlogs for that, because video recording is very challenging.
Today I want to talk about my challenge of video recording and editing using FOSS, scripting with Ruby and some DIY.
Theory
YouTube helped me to start learning theory about vlogs recording. I also found this free Russian course helpful (specifically the module about making vlogs and a video about types of camera shots from the module about reporting). A brief review of popular proprietary video editors’ features helped me choose FOSS video editor more consciously.
I didn’t take a risk to invest in lighting: no time to learn to find an optimal solution. Brief review of cheap options revealed potential issues, such as flickering and poor color temperature. Daylight didn’t make much trouble: it’s fine for relatively short videos.
Video Editor
Existing FOSS video editors come with lots of known issues: from poor UI ideas and freezes, which turn editing process into infinity, to memory leaks, crashes and sudden visual artefacts, which appear on final rendering only.
It took time to select a video editor and learn its bugs to just being able to do basic things. I ended up with Pitivi, just because I’ve already spent too much time on the research.
Sound Out Of Flatpak
The supported way to install Pitivi requires Flatpak. I was avoiding it for a while, because I don’t have systemd and PulseAudio in my OS.
Eventually I figured out that systemd is no longer needed.
What about PulseAudio?—I had to install and configure it
it was easier to
modify Flatpak instead.
Though it’s be better to install PulseAudio, it’s just a bit boring and it’s not clear
whether it will cause issues with sound recording on my hardware or not.
Let’s install Pitivi, remove PulseAudio’s configs, and run it:
$ sudo flatpak remote-add --if-not-exists flathub https://flathub.org/repo/flathub.flatpakrepo
$ sudo flatpak install flathub org.pitivi.Pitivi
$ sudo find {/var/lib,~/.local/share}/flatpak/runtime -type f -name '*pulseaudio*.conf' -delete
$ flatpak run --device=alsa --branch=stable --arch=x86_64 --command=pitivi org.pitivi.Pitivi
No sound. Let’s try to run something simpler, like aplay:
$ sudo find /var/lib/flatpak/app/org.pitivi.Pitivi/x86_64 -type d -path '*/files/bin' -exec cp `which aplay` {} \;
$ flatpak run --device=alsa --branch=stable --arch=x86_64 --command=aplay org.pitivi.Pitivi /dev/urandom
ALSA lib dlmisc.c:162:(snd_dlsym_verify) unable to verify version for symbol _snd_pcm_empty_open
ALSA lib dlmisc.c:283:(snd1_dlobj_cache_get) symbol _snd_pcm_empty_open is not defined inside [builtin]
aplay: main:828: audio open error: No such device or address
Perhaps alsa-lib, from Flatpak, was built with --with-versioned flag.
Quick solution: replace libasound.so with a library from the host system:
sudo find /var/lib/flatpak -type f -name libasound.so.2.0.0 -exec cp /usr/lib64/libasound.so.2.0.0 {} \;
find ~/.local/share/flatpak -type f -name libasound.so.2.0.0 -exec cp /usr/lib64/libasound.so.2.0.0 {} \; # if something with user permissions was installed
For me it was not enough:
$ flatpak run --device=alsa --branch=stable --arch=x86_64 --command=aplay org.pitivi.Pitivi /dev/urandom
ALSA lib /var/tmp/portage/media-libs/alsa-lib-1.1.6-r1/work/alsa-lib-1.1.6/src/pcm/pcm_direct.c:1943:(snd1_pcm_direct_parse_open_conf) The field ipc_gid must be a valid group (create group audio)
aplay: main:828: audio open error: Invalid argument
I also needed ALSA config file:
$ sudo find /var/lib/flatpak -type d -name etc -exec cp /etc/asound.conf {} \;
$ find ~/.local/share/flatpak -type d -name etc -exec cp /etc/asound.conf {} \; # if something with user permissions was installed
$ flatpak run --device=alsa --branch=stable --arch=x86_64 --command=aplay org.pitivi.Pitivi /dev/urandom
Finally Pitivi is ready for using.
Rendering settings for Pitivi I use:
- container format: MP4
- video
- codec x264enc
- advanced
- encoding pass/type: constant quantizer
- constant quantizer: 18
- bitrate: 16384 kbit/s
- speed quality preset: ultrafast
- psychovisual tuning preset: film
- audio
- libav ALAC
- I also use “Never render from proxy files” at my own risk
- everything else is by default
Other Effects
I make some text animation effects with screencasting of fullscreened web pages, which I make with reveal.js and animate.css. I also add a transition sound for some reveal.js slides:
<section style="font-size: 5em">
  <audio data-autoplay src="/path/to/sound.wav"></audio>
  #1
</section>
Turns out 60 FPS is important when recording screencasts with very large text. This is how I make the screencasts:
#!/bin/sh

SOUND_INPUT=shared_input_loopback
CHANNELS=2
SOUND_RATE=48000
FRAMERATE=60

DRAW_MOUSE=0
VIDEO_SIZE=$(xdpyinfo | awk '/dimensions:/ { print $2; exit }')
OUTPUT="${HOME}/video/screen/$(date --rfc-3339=seconds).mp4"

ffmpeg \
    -thread_queue_size 512 \
    -video_size "${VIDEO_SIZE}" \
    -framerate "${FRAMERATE}" \
    -f x11grab \
    -draw_mouse "${DRAW_MOUSE}" \
    -i :0.0+0,0 \
    -thread_queue_size 512 \
    -f alsa \
    -ac "${CHANNELS}" \
    -i "${SOUND_INPUT}"  \
    -ar "${SOUND_RATE}" \
    -vcodec libx264 -preset ultrafast -crf 18 \
    -acodec alac \
    -f ipod \
    "${OUTPUT}"
In my case shared_input_loopback—is a device from
asound.conf.
I also found this ffmpeg wrapper for clip transitions helpful.
Video Recording
I decided to use front camera of my Meizu MX4 to record videos with Open Camera.
It took time to train myself to look into the camera and control my position, to not make a typical mistake like cutting off part of my head. I also needed to talk clear and loud enough, gesticulate and generate at least some facial expressions. But it was just the beginning.
Why did I decide to make automatic jump cuts right on the video recording step?
- Poor Pitivi’s UI responsiveness and bugs during video editing, especially when using Ripple Move/Edit, which made me restart Pitivi periodically.
- For me personally setting jump cuts manually is just one of the most boring things. Of course it’s not really possible to fully automate this process (at least without scenario with explicitly labeled pauses, which are needed to comprehend what was said), but at least this process can be optimized.
These are the requirements/features I set for a quick hack to solve the problem:
- Record video with Android device, record sound with laptop.
- Control camera focus.
- Stop recording to save or delete last recorded fragment.
- Download video from Android device via USB with retries and resuming in case of failures, without blocking ability to record the next fragment.
- Sound synchronization.
- Voice detection and pause dropping.
- Play last recorded fragments with dropped pauses.
Why would I need so much control for my devices on the recording step? Why not just run recording for several hours and then edit it? There are quiet a lot of reasons:
- Simply not enough disk space.
- The phone tends to overheat and quickly discharge when recording for a long time.
- Sensor screen is broken, because the phone was in water. But I need to control camera focus. Also tapping would create additional device vibration.
- Poor USB ports power in my laptop cause troubles when downloading large files from my phone. In theory it could be solved with USB-hub with additional power supply. Using network instead is just too slow.
- A desire to review last recorded fragments, to make sure that no mistakes were made, so I could rerecord the fragment quickly, until the planet turns on the wrong side towards the sun.
- A desire to drop bad shots as early as possible, to not waste time and disk space on them in the future.
- Long audio streams recorded with laptop and phone should be synchronized. Here A/V desync can happen because both laptop and phone can drop audio frames randomly (which likely can be solved somehow, it’s just I don’t want to risk spending time on experiments). It’s easier to synchronize small fragments separately, so desyncs won’t be noticeable.
- Open Camera restarts recording after reaching 4 GiB. This event should be processed somehow. That would likely require Open Camera modification. If this 4 GiB limit cannot be removed or extended—I’d need to throw an event to laptop, so laptop could label a particular point of time with information that video recording was restarted there.
It’s easier to record small fragments and make primitive automation of everything possible. To develop the hack I chose Ruby as the main language. Actually I would likely choose Python nowadays but at that moment I just started learning Ruby and I always test new languages on weird experiments like that.
Automated Jump Cuts
There is not too much information on this topic in the net. Here’s an amazing research by Stanford and Adobe which I forgot about (which was not a problem because I need a simpler solution).
In my solution there are two stages when jump cuts are generated: a rough version on the recording stage, and more precise one on the rendering stage (with ability to edit too harshly cut fragments). The rough version was implemented with VAD from WebRTC. The more precise one was implemented with Google Speech (specifically by modifying autosub, a project for subtitles generation for videos). And I’m sure that there are better solutions, it’s just the best one that worked quickly.
If you want to develop something similar with ffmpeg then stick to the following principle:
don’t try to make too much with a single ffmpeg call.
Make intermediate files and control every step, so you won’t waste time looking for weird ungoogleble bugs,
like wrong cuts or unapplied effect.
I run the resulting madness this way:
$ bin/vlog-recorder \
    --project /path/to/project \
    --debug true \
    --sound-settings ' --device=usb_card --format=dat' # arguments for arecord

r - (RE)START recording
s - STOP and SAVE current clip
S - STOP and SAVE current clip, don't use auto trimming
d - STOP and DELETE current clip
p - PLAY last saved clip
f - FOCUS camera on center
h - show HELP
q / Ctrl+C - QUIT

[ stopped ] [ battery: 100% / 36°C ]
I need to set arecord arguments just to explicitly set the device,
to avoid periodical issues, which are likely caused by dsnoop ALSA plugin for me.
You can also open a log to control the process of file downloading from the phone:
tail -f /path/to/project/log.txt.
To quickly render everything into one preview video run:
$ bin/vlog-render \
    --project /path/to/project \
    --language ru \
    --video-filters 'hqdn3d,hflip,curves=psfile=/path/to/curves.acv,vignette' \
    --speed 1.3 \
    --fps 60 \
    --preview true
The argument --video-filters is filters, for ffmpeg.
Video will start playing automatically in mpv media player.
You can reorder or drop the remaining bad shots by editing the output file
/path/to/project/render.conf.
Recognized voice will help you with it, which is
not a new idea, BTW.
You can also speedup individual fragments and edit too harsh cuts, if any of them exist.
Next time vlog-render will reread render.conf and apply changes.
To prepare fragments for video editing—use --preview false.
Besides fragments in output directory, it will also combine them into a single file output.mp4,
because initially I wasn’t sure:
- whether I will use small clips in Pitivi
- or I will use a single video (so it would be possible to apply a bunch of effects to a “group” of clips).
In most of the cases I use the first option.
The second one was helpful for a video with bad lighting:
I used only a part of output.mp4 there.
Also, vlog-play-segments can be helpful for the second option:
it plays all pauses between clips sorted by lengths in a descending order.
This will help you edit render.conf more precisely
which will save time on editing this long video chunk in Pitivi.
Small output clips can be easily loaded onto Pitivi’s timeline: select all imported clips and throw them onto timeline with drag-n-drop.
Phone Stand
I didn’t want to spend time looking for a suitable stand, so I made it out of carton:
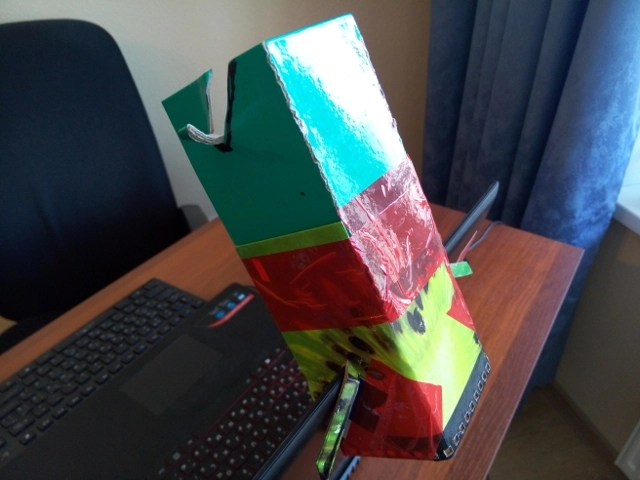
It’s designed to be mounted on my laptop’s display, so the distance between script and camera could be minimized.
Sound Recording
Good sound quality is very critical. I used a mic Boya BY-M1. Even though it’s advertised as omnidirectional mic, for me it gave the best quality when I used it as unidirectional.
It was even simpler to make a mic stand: just take a glass bottle, duct tape and assemble this construction set:
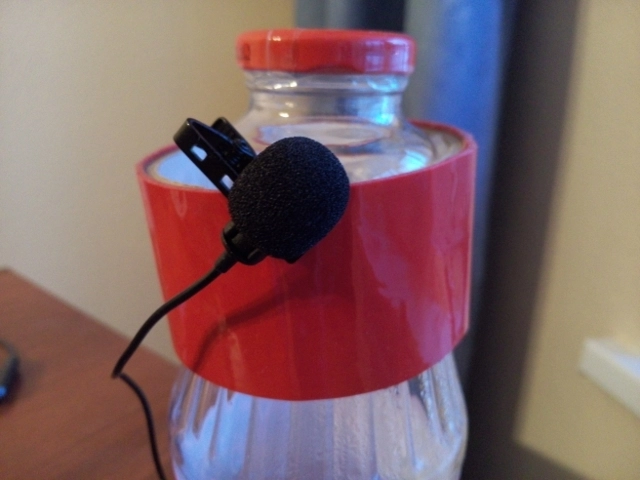
A towel can also be put under this construction to decrease vibrations from table and to adjust height.
Sound Card
It’s ASUS Xonar U3 in my case. However it turned out that it’s incompatible with my mic: the mic has CTIA plug which is designed for phones. The problem was solved with CTIA to TRS adapter. And it was a bit hard to find it: vendors often don’t write any details about such adapters. In my case Cablexpert CCA-418W helped me.
Another problem with sound card is DC offset in the right channel. Which is not a big deal because I record in mono. I also made a redirection of good channel to the bad one, for software that doesn’t support recording in mono.
This card also hates overheating. Keep it away from the cooler or else it will record sound with random lags.
Sound Editing
I use headphones (Pioneer SE-M390 in my case) with a higher volume than the one I normally listen to music with. Here’s the algorithm:
- Render sound separately with Pitivi (using the same ALAC and MP4). I often make multiple distinct tracks, choosing particular layers in Pitivi, temporary removing unnecessary ones.
- If we import the files into Audacity—we will lose stretches/squeezes of the audio streams,
which may lead to A/V desync.
Which is not obvious, it happens only for some videos.
To avoid this issue—just apply the stretches/squeezes:
ffmpeg -async 1 -i input.mp4 output.flac - Now import tracks into Audacity. Add background music if you need it.
- Set Gain per each track.
- Apply effects to the voice track: Noise Reduction (twice in my case), Compressor and Equalization using tips from this video.
- Align and amplify volume of the voice track. One of the classical ways to do that is: Normalize, Amplify, Limiter and Normalize again, but I haven’t been yet able to get a good sound quality that way.
Temporarily I do the next thing: set Gain to the track the way the most loud part doesn't overload and then amplify particular fragments manually.Update: another powerful method is RMS Normalize, Limiter and an ordinary Normalize. Here’s the settings for RMS Normalize and Limiter. Though I didn’t have any use for it because I’m migrating to a new mic (Zoom H1n) with embedded Limiter, which seems to work great for me (so with a new mic, I will likely use ordinary Normalize only, instead of all of these things). - Sometimes mic records strange clicking sounds. They can be removed with “Spectral edit multi tool” effect. I usually apply it multiple times for a selected area, with Ctrl+R. Update: I figured out that these clicking sounds is not a mic issue, it’s something external instead. Most likely it’s a combination of mouth noise and some other room noises.
- Export from Audacity to FLAC and combine everything to a single file:
ffmpeg -i sound.flac -an -i video.mp4 -c copy output.mkv - It was important to test at least the first video on various sound volumes and devices.
Result
If you are Russian speaker—check out my YouTube channel where I share my insights on effective ways to learn programming and closely related subjects.
Good luck with software development and vlogging!
Nostr Login
Nostr Login
Relays not found 🤷
Please choose and set them in your NIP-07 compatible browser extension or in your 👤 profile.
Here's the list of recommended relays:
Report this comment thread? 💬